Υποστήριξη πελατών HP - Γνωσιακή βάση δεδομένων
HP Sprocket 200 Printers - Blinking Red Charging Indicator Light
This document is for HP Sprocket 200 Photo Printers.
The printer is connected to a power source, but the Charging Indicator light blinks red and the battery does not charge. The printer might be too warm.
ΣΗΜΕΙΩΣΗ :This document is for a blinking red Charging Indicator light. For information on a blinking red Status Indicator light, go to Resolving a Blinking Red Light.
Step 1: Let the printer cool
The battery might not charge if it is too warm, above 40º C (104º F). Disconnect the printer and let it cool down before you charge it or use it again.
-
Turn off the printer, and then disconnect the USB cable.
-
Let the printer cool for at least 15 minutes.
-
Turn on the printer.
-
If the printer turns on, you do not need to continue troubleshooting. To avoid overheating the battery in the future, let the printer cool down between print jobs and keep it in a cool, dry environment when you are not using it.
-
If the printer does not turn on, continue to the next step.
-
Step 2: Charge the printer
The battery might not have enough power to turn on. Charge the printer for at least 30 minutes, disconnect it, and then turn on the printer.
-
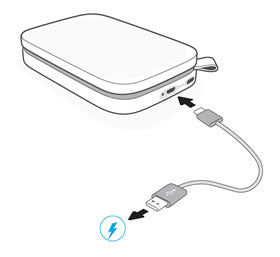
Connect the USB cable to the printer, and then connect the other end to a power source with at least 2 AMPs, such as a wall adapter or USB-capable power strip.
-
Charge the printer for at least 30 minutes or until the Charging Indicator light turns green.
-
Disconnect the USB cable from the printer.
-
Turn on the printer.
-
If the printer turns on, you do not need to continue troubleshooting. To avoid overheating the battery in the future, let the printer cool down between print jobs and keep it in a cool, dry environment when you are not using it.
-
If the printer does not turn on, continue to the next step.
-
Step 3: Reset the printer
If the printer does not turn on when you press the Power button, reset the printer to clear any errors.
-
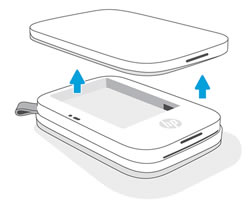
Remove the paper cover.
-
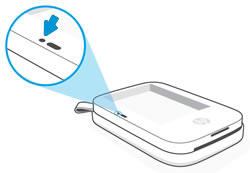
Locate the Reset button.
-
With a paperclip or pin, press and hold the Reset button for 3 seconds.The printer resets.
-
Replace the paper cover, and then turn on the printer.
-
If the printer turns on, you do not need to continue troubleshooting. To avoid overheating the battery in the future, let the printer cool between print jobs and keep it in a cool, dry environment when you are not using it.
-
If the printer does not turn on, continue to the next step.
-
Step 4: Service the printer
Service or replace your HP product if the issue persists after completing all the preceding steps.
Go to Contact HP Customer Support to schedule a product repair or replacement. If you are in Asia Pacific, you will be directed to a local service center in your area.
To confirm your warranty status, go to HP Product Warranty Check. Repair fees might apply for out-of-warranty products.

 Diagnostic


